
![]()
Thank you for purchasing a boot disk from ADVPLANS and/or The Classic Archives. Visit us at www.theclassicarchives.com for more great deals.
This is page is an intro to explain the basics of booting from a CD that was purchased from us. We send out boot CD's and keep getting the same questions all the time, so we put up this page to answer some basic FAQ's.
This page will show you how to set up your computer and to boot from this CD. Scroll down below for details on each of the utilities covered in the boot CD.
DISCLAIMERS:
1. We make no warranty or guarantees that any of the below steps will work on every system. We are not responsible for any damage that you do to your system if you do not properly understand any of the below steps. Please take responsibility for your own actions.
2. We send out Boot CD's and other CD's for a few dollars. This doesn't entitle you to one on one email support to answer your questions one by one and walk you through it. We simply cannot afford to do that. You must be qualified and confident to answer your own questions and look up your own answers. The below guide was meant to help. If your questions are not answered below, you must use your own resources to get them answered. We never provide technical support on our software distributions, but we also disclose that to everyone prior to purchase in all of our listings. If your disk is damaged or does not work properly, we encourage you to contact us for a replacement, but we will not help you troubleshoot your system, so please do not ask.
3. The steps below show you how to boot from a CD for many different types of BIOS. If your BIOS is different, the steps should still be very similar.
4. Before you change your setting in your BIOS, make sure you write down what they are now, so if you need to go back to them, you know what they were.
5. After you are done setting your BIOS to boot from a CD, and you are done working with a CD, you should go back and set the BIOS to what it was before with the information you wrote down.
6. We cannot tell you what computers this will work on and what problems this will fix. We do not answer tech support questions, simply because we feel we can not provide an adequate solution to fix a computer that we are not sitting in front of.
7. Boot CD's are independent of which version of Windows you have. They were outside of windows to do diagnostics on a computer.
How to Set BIOS to Boot from CDROM:
All modern Computer Systems manufactured in the last decade or more, support boot from cd feature, but it is typically required to enable this feature from BIOS.
When you start your computer, and it goes through the initial bootup, before it starts windows, check the boot-screen for which key is the setup key, In most newer pc it will be DELETE key, so make sure to check it.
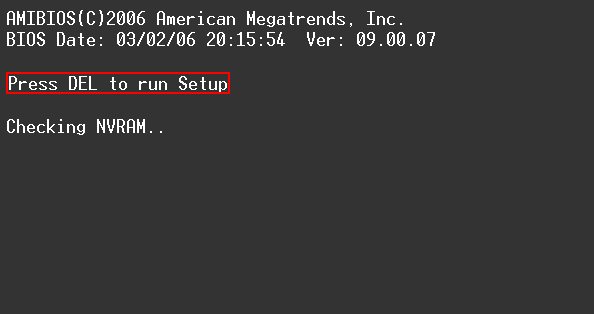
If you have AmiBios, it will require you to press DEL key to enter setup. You must hit the DEL key before this screen goes away on boot up and before it starts to load up Windows, otherwise you will need to shutdown and restart it again. You only have a few seconds before windows starts to load after you start up your machine.
Then, you will see some similar screen. Use the arrow keys to navigate over to the BOOT option and choose Boot Device Priority and choose first boot device to CDROM and second boot device to HARD DRIVE You can press F10 to save settings.
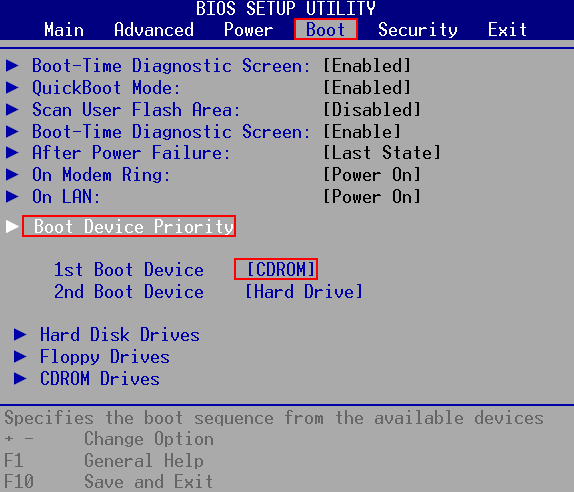
Before you hit F10, install the CD that you want to boot from into your CD drive. Once you hit F10, your computer will restart and if you have a CD in your drive, it will try to boot up from it. After you are done installing the OS or working with a boot up CD, make sure to go back into the BIOS, and set it to boot from the hard drive again as the first boot device.
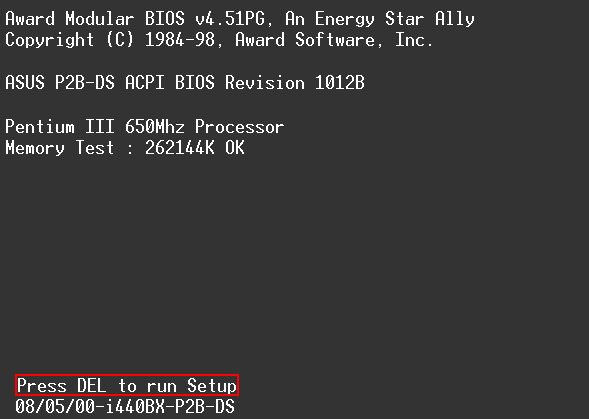
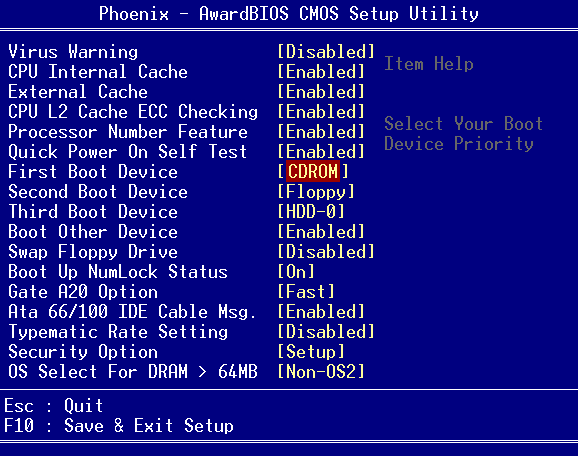
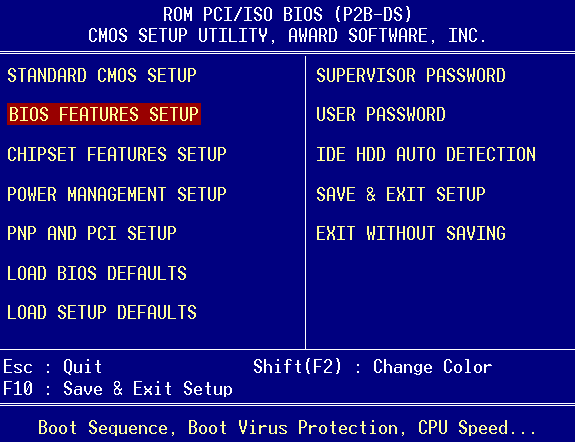
If you have Award Bios, you will see some similar screen and it will also say to hit the DEL key to Enter setup. Again, you must hit this key before your machine gets off this screen.
The BIOS menu may look similar to this. Then you use the arrow keys to navigate to the Advanced Bios Features:
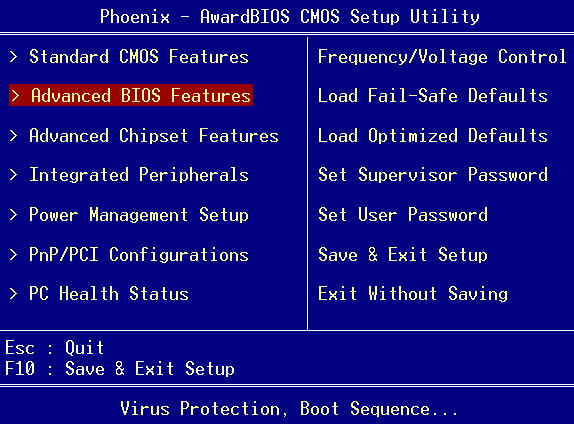
and there you will use the arrow keys and Enter key to select the First Boot Device to CDROM and second or third to HDD-0. Then, again, before exiting out, install your CD into your drive, Press F10 to save your settings, and your machine will reboot and try to boot from the CD. Again, change your settings back after you finish install the OS or working with a boot CD.
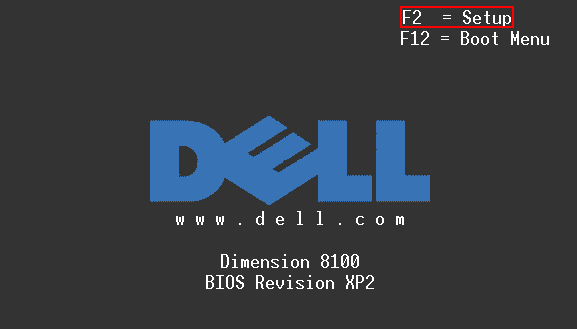
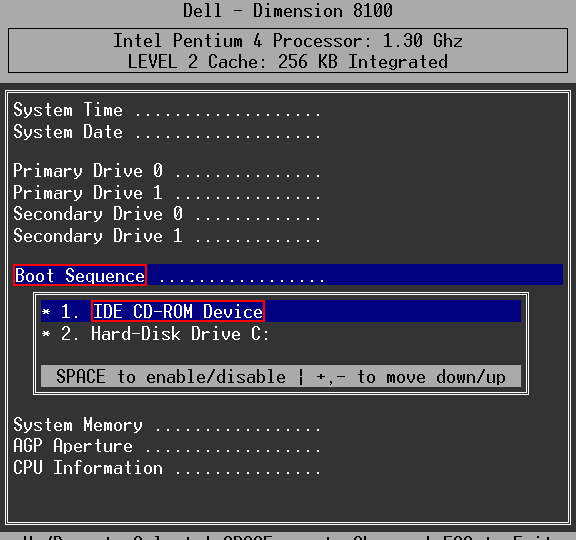
On some Dell Systems you can enter the bios by pressing F2
Then choose Boot Sequence and then arrange 1 to CD-Rom by pressing - + and press space to enable it. Install the CD, Press ESC and choose save settings and exit. Make sure you return to the BIOS and change the settings back after you are done.
Sometimes you can press F12 or F2 to temporary boot from cd on some Dell Systems
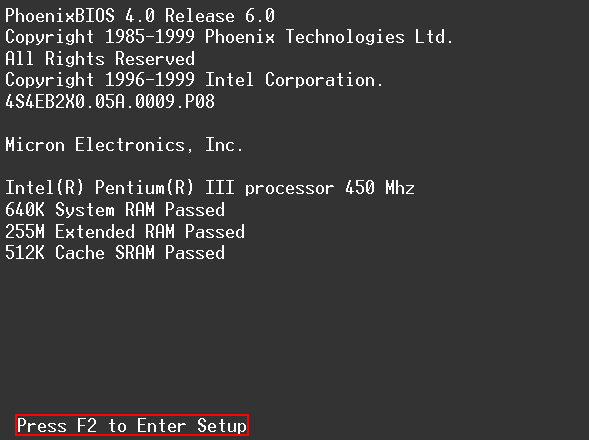
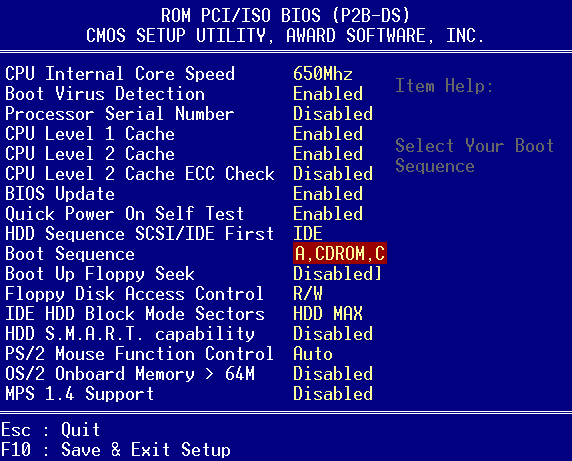
Press F2 to enter bios setup and sometimes you need to navigate to the BIOS FEATURES SETUP.
and set Boot Sequence to A,CDROM,C and Press Esc, then load your CD into the drive, and then F10 to save your settings and restart your machine, and then it will boot up from your CD. Again, make sure you change it back when you are done.
Once you have your machine set to boot from a CD, and you start your machine with a CD in the drive already, it will attempt to boot from that CD first. At that point, if you are loading an operating system, the system will begin to load and you will be able to work through the prompts to get your system installed.
The below guide is written to show you the general procedure of installing a copy of Linux Ubuntu. While this guide may not match your exact version of Linux Ubuntu, it should give you an idea. Your version of Linux Ubuntu should be installed similarly.
WORKING WITH A BOOT DISK
1. Insert the Boot disk into your CD drive and set your PC to boot from the CD with the steps described above.
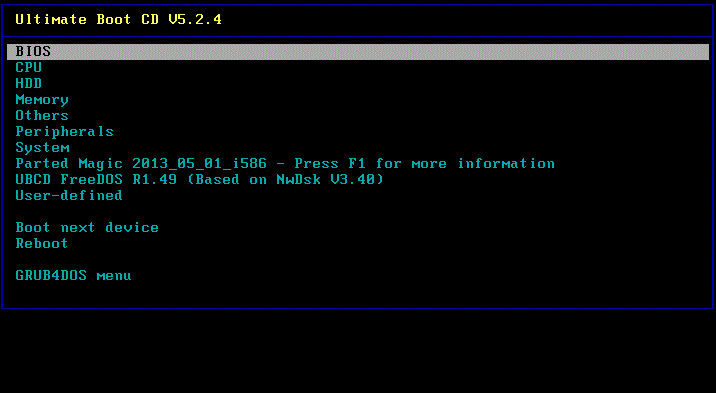
2. Start or restart your computer. The Menu screen appears. Depending on your version of boot CD, it should look something like this:
From here, you can navigate through the menus to determine what actions you want to perform.
Depending on your version of boot cd, if you insert it in your drive while windows is running, it should only open up a web page with links to web pages that describe each utility on the boot disk.
Proceed with caution on any utility. If you are not careful, you can run utilities that will format drives which could cause you to lose date. Below is information on the utilities on this disk.
Good luck.